
Temenos Lifecycle Management Suite - Collection Product Guide
Letters and Forms
| Administrator Guide > Communication > Letters and Forms |
 |
The first time the Letters and Forms page is opened in the Lifecycle Management Suite, an error message prompting the administrator to install a CAB file from an unknown publisher may be received. The required CAB file is provided to the institution by Temenos. Please contact a Temenos Customer Care Representative for more information. |
The Letters and Forms page (System Management > Communication > Letters & Forms) enables administrators to easily manage letters and letter templates within the Lifecycle Management Suite. Letters configured within this page can be incorporated into the Send Letter workflow step and run by users when working persons or accounts.
 |
For more information on the configuration of the Send Letter workflow step, please see the Send Letter Workflow Step topic in this guide. |
By default, all letters and forms are displayed within the grid; however, administrators can filter results by either typing in the filter box or using the View drop-down.
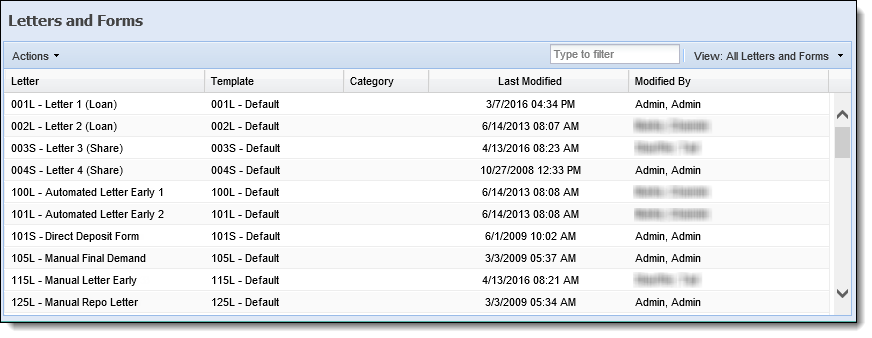
The grid on this page displays the following columns of information for each letter:
| Column Name | Description |
| Letter | Displays the name of the letter in the following format: Letter Code-Letter Name. |
| Template | Displays the name of the template to which the letter is associated. |
| Category | Displays the category of the letter. |
| Type | Designates whether it is a letter or a form. |
| Last Modified | Denotes when the last modification on the letter was made. |
| Modified By | Denotes who made the last modification on the letter. |
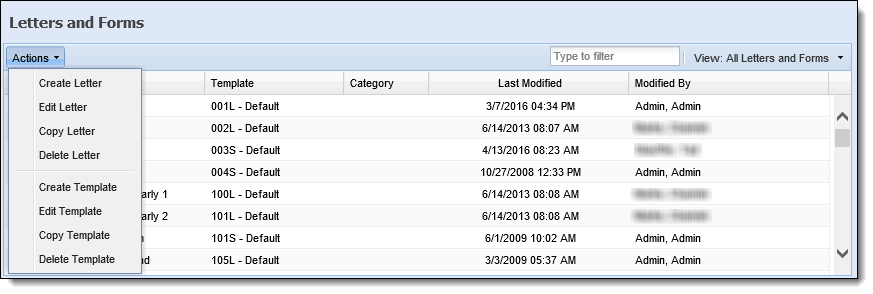
The Actions drop-down that appears above the grid displays all of the functions associated to the Letter and Forms page, such as creating and editing both letters and templates.
|
Please see the sections in this topic for Letter Actions and Template Actions for an overview of each function that can be performed within the Actions drop-down. |
The Letters and Forms topic provides administrators with the following information to create and manage letters and letter templates:
All letters share common attributes that are defined when creating, editing, and copying a letter.
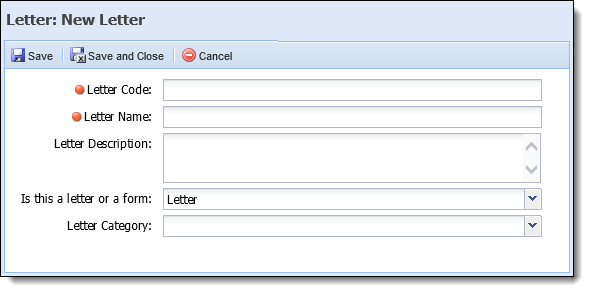
The following Letter attributes are defined for each letter:
| Attribute | Description | ||
| Letter Code | Enter a Letter Code. This is a required field. | ||
| Letter Name | Enter a Letter Name. This name appears in the Send Letter workflow step when selecting the letter that is to be sent. This is a required field. | ||
| Letter Description | If desired, enter a description to provide more information about the letter. | ||
| Is this a letter or a form |
From the drop-down, identify whether the document is a letter or a form.
|
||
| Letter Category |
From the drop-down, select a category for the letter. This is optional and is used for reporting purposes.
|
Templates provide administrators with the ability to define the foundation and content of the letter, such as the fields and grids that populate with information for the applicable account holders, as well as determine how a letter is generated and to whom a letter including account and/or person information is sent.
|
By default, letter templates are saved in .docx format, enabling the ability to use developer tools within Microsoft Word when creating the template. Templates can be configured using developer tools to create attributes, such as check boxes and drop-down lists within Word documents.
|
To begin creating a letter template, select a letter to apply the template to within the Letters and Forms grid and click Create Template in the Actions drop-down.
Within the New Letter Template window, administrators are provided with the ability to define the following template attributes:
General attributes allow administrators to define the basic information for the template, such as the letter template code and letter generation method.
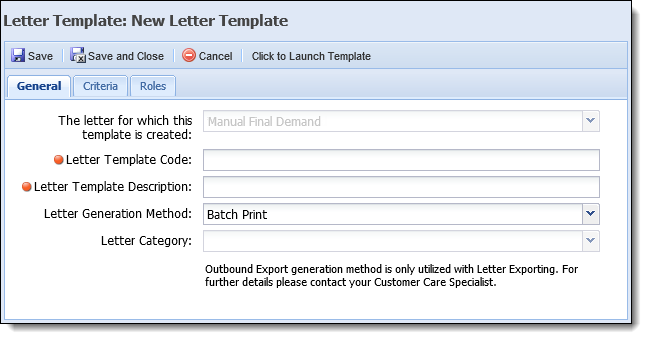
The following template attributes are defined within the General tab:
| Attribute | Description | ||
| The letter for which the template is created | A read-only field that displays the letter for which the template is being created. | ||
| Letter Template Code | Enter the template code for the new template. The template code carries over from what was defined when the letter was created. Temenos recommends keeping the code the same as the letter for consistency purposes. This is a required field. | ||
| Letter Template Description | Enter a description for the new letter template. This is a required field. | ||
| Letter Generation Method |
Select one of the following letter generation methods:
|
||
| Letter Category | A read-only field that displays the category defined during creation of the letter. |
Criteria attributes allow administrators to define the criteria an account must meet in order for a specific letter template to be generated. When a letter is associated with multiple templates, the criteria defined within this tab determines which template is used when the letter is generated.
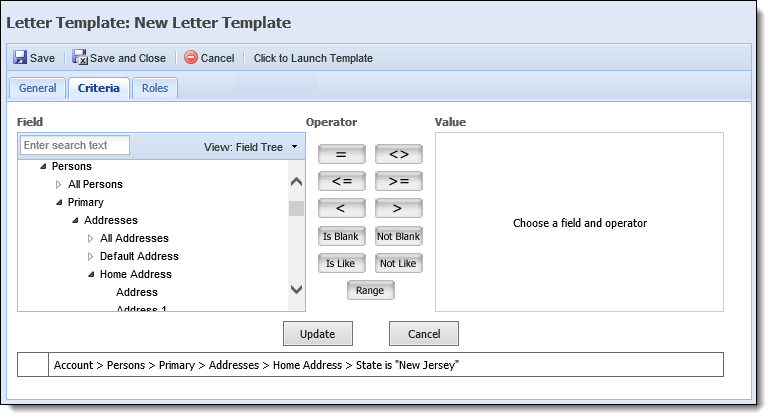
For example, an institution may have customers in three different states: New Jersey, Delaware, and New York. Because of statewide regulations, the templates for each state must be designed differently to conform to the regulations for each state. When building a template for the state of New Jersey, the administrator can set the criteria to look for the primary’s home state to be New Jersey so when the letter is sent, it is only sent to appropriate customers in New Jersey.
Role attributes enable administrators to assign the role types that are to receive the letter. When a letter including account and/or person information is generated in the Send Letter workflow step, it is sent to all account holders related to the account(s) associated with the workflow who hold a role that corresponds to a role type assigned within this tab.

The following role attributes are assigned within the Roles tab:
| Attribute | Description | ||
| Available Roles |
Displays a list of all roles defined in System Management > Role Types. Assign roles to the template by selecting the desired role type(s) from the list and moving the role type(s) to the Assigned box using the arrows that are displayed.
|
||
| Assigned Roles |
Displays the roles types to receive the letter. When a letter including account and/or person information is generated in the Send Letter workflow step, the system automatically generates a letter to the person(s) with the role types assigned within this box.
For example, when the Primary and Secondary role types are assigned to a letter template, both the primary and joint account holders receive a letter once it is generated.
|
Letters are formed by first creating a letter and then building a template for the letter.
The Actions drop-down that appears in the Letters and Forms page provides administrators with the ability to easily create and manage both letters and templates.
Within the Actions drop-down, administrators are provided with the ability to perform the following actions to create and manage letters:
To create a letter:
 to create the letter. The new letter populates within the Letters and Forms grid.
 |
To avoid having multiple templates for the same letter, it is recommended to edit the default letter template rather than create a new template. |
|
For information on how to define a letter template, please see the Creating a Template or Editing a Template section in this topic. |
To edit a letter:
 to retain the changes and return to the Letters and Forms page.
To copy a letter:
to create the letter. The new letter populates within the Letters and Forms grid. After the letter is created, select the letter within the grid and navigate to the Actions drop-down to begin creating a template for the letter.
|
For information on how to define a letter template, please see the Creating a Template section in this topic. |
|
Letters associated with a workflow cannot be deleted. When attempting to delete a letter that is associated with a workflow, a message appears to inform that the letter cannot be deleted. To delete the letter, the letter must first be removed from the workflow(s) to which it is associated. |
To delete a letter:
Within the Actions drop-down, administrators are provided with the ability to perform the following actions to create and manage templates:
|
The ability to create or edit a letter template is not supported in the Edge browser. When trying to create a new template, or edit an existing template in Edge, an error message is received stating that the Temenos Browser Control failed to load, and should be downloaded from the Help menu. The Temenos Browser Control is not available for the Edge browser; therefore, it cannot be downloaded from Download Controls option in the Help menu. |
|
If a letter is not selected within the grid, a message appears upon clicking any of the below actions to inform that a letter must be selected in order to perform the action. |
Templates are created by defining the template attributes and customizing the content of the letter within the template editor.
|
Please see the Template Editor section in this topic for more information on the functionality available to customize letters within the template editor. |
in the New Letter Template window to create the template. The new template populates with the assigned letter in the Letters and Forms grid and the letter is available to be added to a Send Letter workflow step.
|
Letters and letter templates are saved in the .docx file format. However, the Lifecycle Management Suite continues to support letters and letter templates saved as .doc files. If a letter template created prior to the 16.00 release of the Lifecycle Management Suite is copied, the copied template continues to save in the .doc file format. |
|
For information on configuring the Send Letter workflow step, please see the Send Letter workflow step topic in this guide. |
To edit a letter template:
|
Since template criteria cannot be edited once a template is created, the Criteria tab is disabled when editing a template. |
|
Please see the Template Editor section in this topic for more information on the functionality available to customize letters within the template editor. |
to retain the updated template and return to the Letters and Forms page.To copy a letter template:
|
If no changes are required to the existing letter content, the template editor must still be opened in order to attach the content to the template being created. If the content within the template editor is not saved, a message appears upon trying to save the new template to inform that a template must be attached prior to saving. Please see the Template Editor section in this topic for more information on the template editor. |
 within the template editor toolbar to apply the letter content to the new template and close the template editor. in the Letter Template window to create the letter template. The new template populates with the assigned letter in the Letters and Forms grid and the letter is available to be added to a Send Letter workflow step.
 |
When a new letter is created, it is assigned a “default” template. Default templates cannot be deleted. |
To delete a letter template:
|
Prior to designing a letter template, it is recommended to determine the type of person information that appears in the letter, such as whether a letter should only include information for the person receiving the letter or should include information for all people associated to the account. This determination drives whether Person fields or Account > Person fields should be used to create the letter template. For more information, please see the Letters and Forms: Person vs. Account > Person Fields example. |
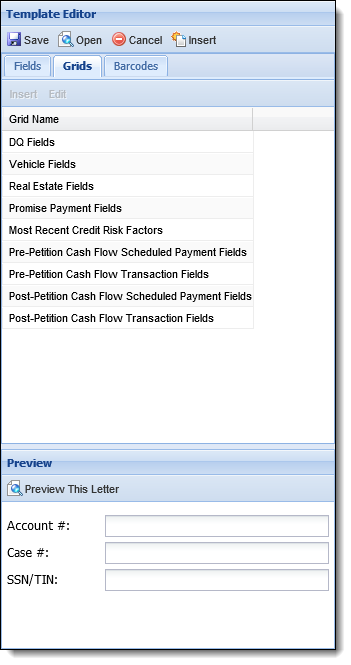
The Template Editor allows administrators to insert fields and/or grids into a Word document to automatically populate information from the Lifecycle Management Suite directly within the letter, as well as add a barcode to a document that automatically identifies the letter as undeliverable if returned in the mail.
Upon clicking Click to Launch Template in the Letter Template window, a Word document opens along with the Template Editor to enable administrators to define the content that appears in the letter template.

The Template Editor enables administrators to easily insert fields and/or grids into a letter template, add a barcode to a template, as well as open an existing Word document to edit and use as a base for the template.
The actions listed below can be performed within the top toolbar:
| Button | Description |
 |
Enables administrators to save the updates made to a template. When this button is clicked, the Template Editor closes and returns administrators to the Letter Template window. |
 |
Enables administrators to open a pre-configured Word document from the File Explorer to edit and use for the template. |
 |
Enables administrators to cancel the changes made to a template. |
 |
Enables administrators to insert a field into the letter template. |
The following tabs appear within the top of the Template editor to provide administrators with the ability to insert fields and/or grids into a letter, as well as add a barcode to a letter template:
The Fields tab allows administrators to add fields to a letter to automatically populate and/or calculate the data when the letter is generated.
This tab displays a list of the fields that are available to add to a letter, grouped into the following folders:
| Folder Name | Description | ||
| Account |
Contains all of the fields associated to the account. The Account folder contains the Primary and Secondary folders. Select fields from these folders if more than one person is being added to the letter.
|
||
| Workflow | Contains all of the fields customized in the Configure Fields tab when building a workflow. | ||
| Person |
Contains all of the fields associated to the person.
|
||
| Case | Contains all of the fields that are associated to a case, including Case Custom fields. | ||
| Account - Promise Fields |
Contains the fields relative to promise amounts, such as First Promise amount, last promise amount, etc.
|
||
| Account - Payment Fields | Contains the fields associated to payments such as payment amount, payment date, transfer source account, and transfer destination account. | ||
| End User Fields | Contains all of the fields that can be used in relation to the user. These fields may be used to sign a letter if the letter should contain the institution employee's contact information. | ||
| Date Fields | Contains the Current Date Fields. These fields are used when the current date or a current day plus a designated amount of days date range needs to be added. | ||
| Pre-Petition Cash Flow Scheduled Payment Fields | Contains the fields associated with payments scheduled for a pre-petition cash flow. | ||
| Pre-Petition Cash Flow Transaction Fields | Contains the fields associated with transactions that were performed on a pre-petition cash flow. | ||
| Post-Petition Cash Flow Scheduled Payment Fields | Contains the fields associated with payments scheduled for a post-petition cash flow. | ||
| Post-Petition Cash Flow Transaction Fields | Contains the fields associated with transactions that were performed on a post-petition cash flow. |
|
Reference the following list for tips to consider when adding fields to a letter template:
|
Grids can be used to present a variety of information in an easy-to-read table format within a letter.
The table below provides an overview of each grid that is available to add to a letter from the Grids tab along with a description of the grid and example of the default properties that are set for each grid within the Grid configuration window.
| Grid Name | Description | Default Grid Properties |
| DQ Fields | This grid contains account related delinquency information such as Balance, DQ Amount, Due Date, etc. | 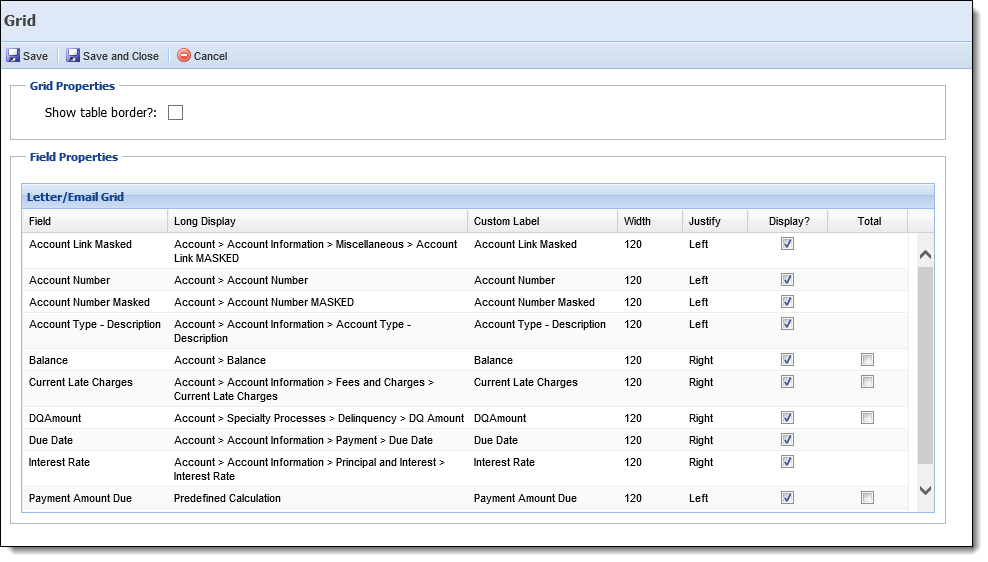 |
| Vehicle Fields |
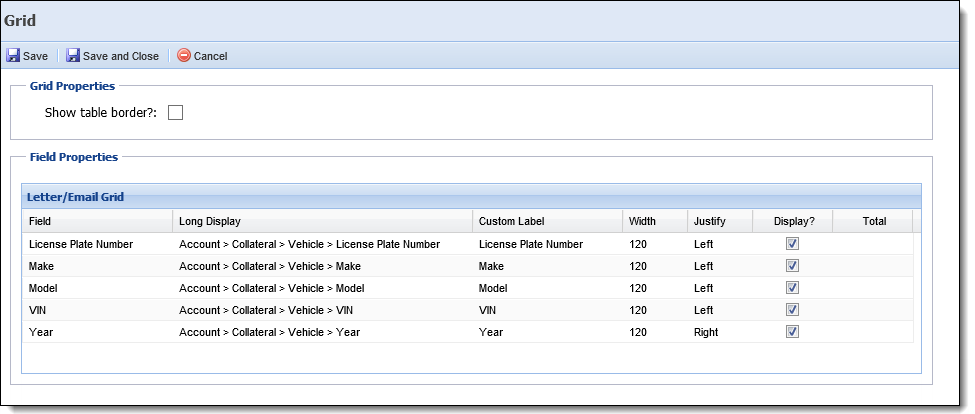
This grid contains vehicle collateral information such as Make, Model, VIN, etc.
The Lifecycle Management Suite supports multiple pieces of Collateral. This allows the institution to place multiple collateral in a letter within a grid. These fields are not available in the field tree. |
 |
| Real Estate Fields | This grid contains real estate fields such as address, description, Parcel Number, and Property type description. These fields are not available in the field tree. | 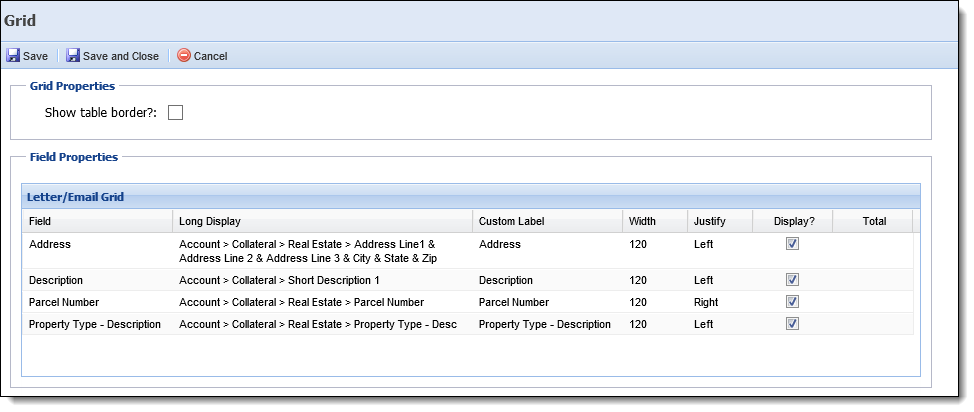 |
|
Pre-Petition Cash Flow Scheduled Payment Fields |
This grid contains fields pertaining to payments scheduled for a pre-petition cash flow. | 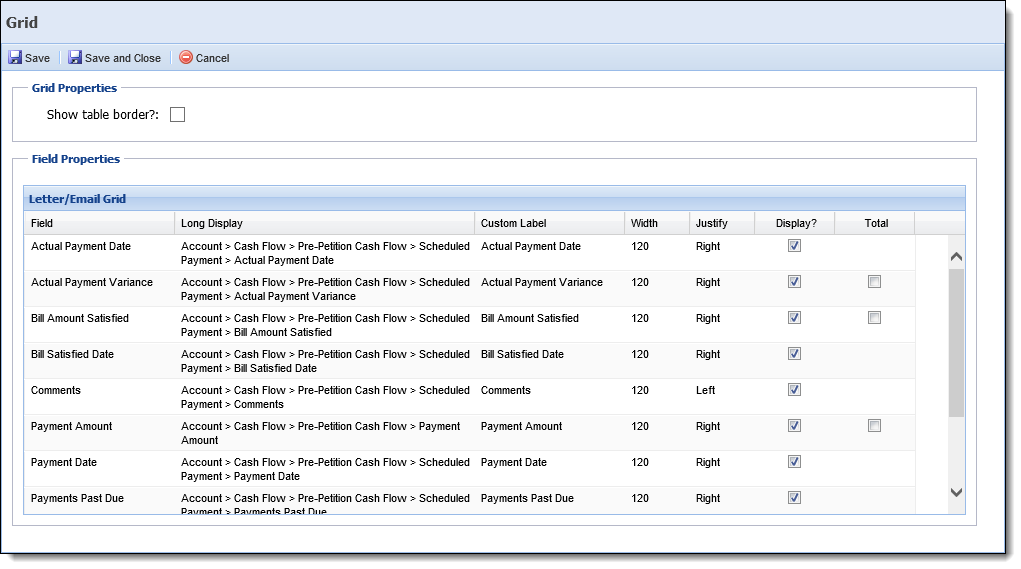 |
| Pre-Petition Cash Flow Transaction Fields | This grid contains fields pertaining to the transaction details for a pre-petition cash flow. | |
| Post-Petition Cash Flow Scheduled Payment Fields | This grid contains fields pertaining to payments scheduled for a post-petition cash flow. | 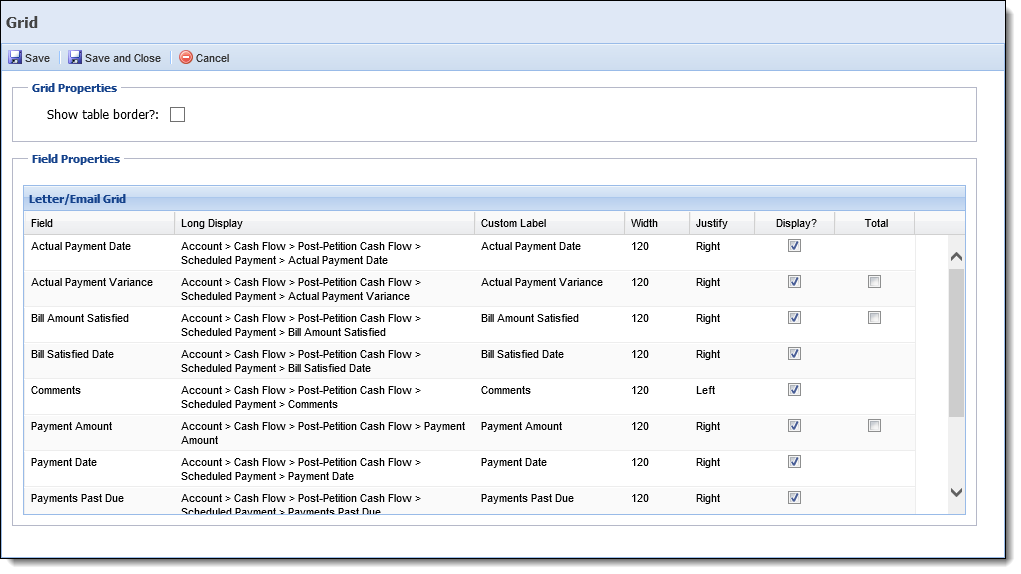 |
| Post-Petition Cash Flow Transaction Fields | This grid contains fields pertaining to the transaction details for a post-petition cash flow. | |
| Promise to Pay Fields | This grid provides pertinent information regarding an account holder's OPEN promise to pay. | 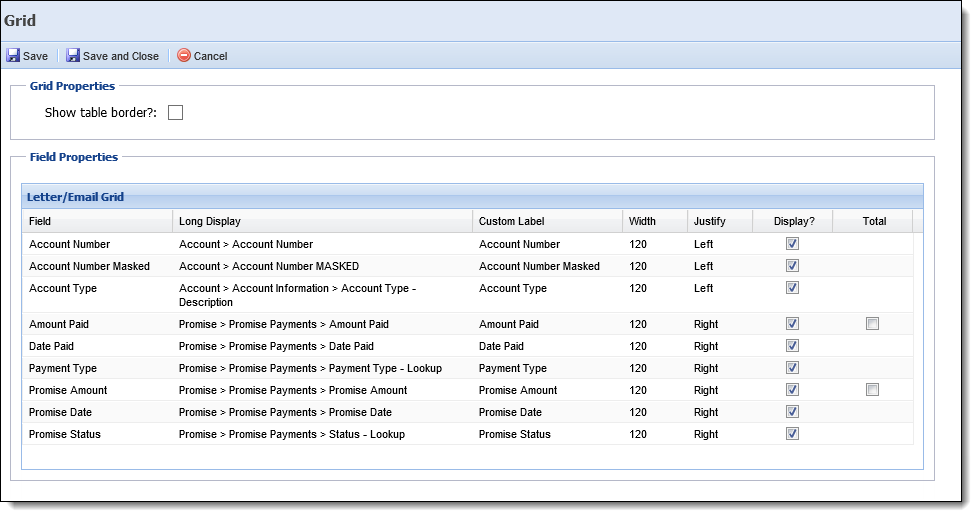 |
| Most Recent Credit Risk Factors | This grid displays any credit report risk factors associated to a person when a credit report is generated. | 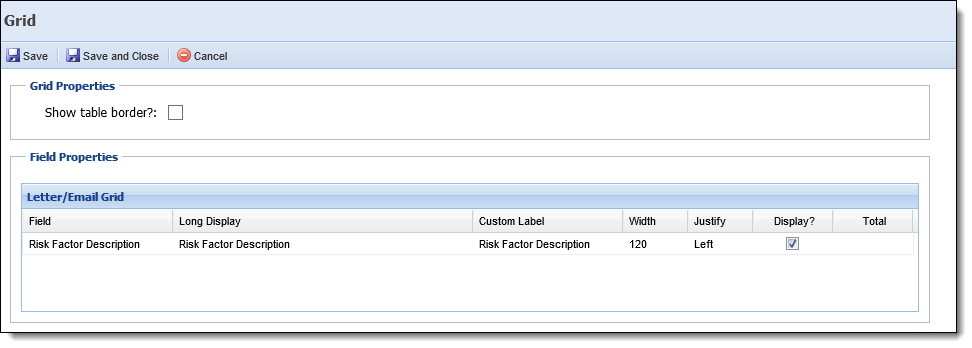 |
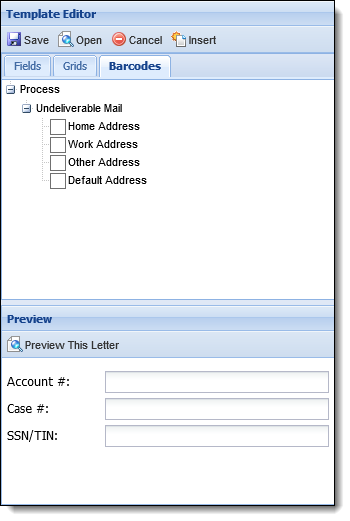
A barcode can be added to a letter template to automatically identify the letter as undeliverable if returned in the mail. When the letter is returned to the financial institution, a scanned image of the letter can be uploaded to a specified location to allow the barcode to be read by a process that automatically attaches the letter to the associated account or case, and sets a bad address flag for the identified address in the Lifecycle Management Suite.
|
In order to use the barcode functionality, the process must be activated within the Letter Barcode Activation page. Please see the Letter Barcode Activation and Scanning Exceptions topic in this guide for more information. |
Within the Barcodes tab, administrators are able to identify the process to be performed when a barcode is scanned, and add the barcode to a letter template.
Each letter barcode includes 10-digit number that associates the letter with a person and address in the Lifecycle Management Suite when the letter is generated.
|
The barcode number is zero padded and increased by one each time a letter is generated. For example, the first time a letter with a barcode is generated, the barcode number is 0000000001; the next letter barcode generated is 0000000002. |
The process for Undeliverable Mail allows administrators to select one of the following options to determine which address is reviewed for the associated person during the scanning process, and set as a Bad Address in the Lifecycle Management Suite:
For example, if Home Address is selected for a barcode, when the barcode is reviewed during the scanning process, the BadAddress flag is set for the home address of the person associated with the letter.
|
For additional information on the scanning process, please see the Letter Barcode Process section of the Letter Barcode Activation and Scanning Exceptions topic in this guide. |
Below the tabs is the Preview section, which enables the ability to review a letter template before it is created. For letters including account, case, and/or person information, administrators are able to enter an account number, case number, or SSN/TIN to generate the letter and automatically populate information specific to the account, case, or person.
|
For more information on this functionality, please see the Previewing a Letter section in this topic. |
To begin creating the letter template, add the desired text to the Word document, leaving spaces for the fields and/or grids to be inserted from the Template Editor.
|
If a Word document contains pre-existing fields, the fields must be deleted and re-mapped using fields in the Template Editor. |
Once all text has been entered, navigate to the Template Editor to begin adding fields or grids to the template.
Within the Template Editor, administrators can perform the following actions to add data to the template, and ensure the template generates correctly before it is created:
To add fields from the Fields tab:
in the top toolbar to add the field to the Word document.
When all fields have been added, insert a grid from the Grids tab or navigate to the Preview section to review the letter template.
To add a grid:
|
While multiple grids can be added to a letter, the same grid can only be configured to appear in a letter once. |
|
The fields that appear in each window are determined by the grid selected. Some of the fields displayed in these grids are not available in the field tree. The following example is for the Promise Payment Fields grid. Please see Grids Tab within the Fields/Grids section in this topic for an overview of each grid and the default settings that appear within the configuration window. |
|
If monetary Amount fields are configured to appear within the letter, the values are rounded using the standard rounding method and are displayed with two decimal places when the letter is generated. |
to retain the properties. Click to return to the Word document.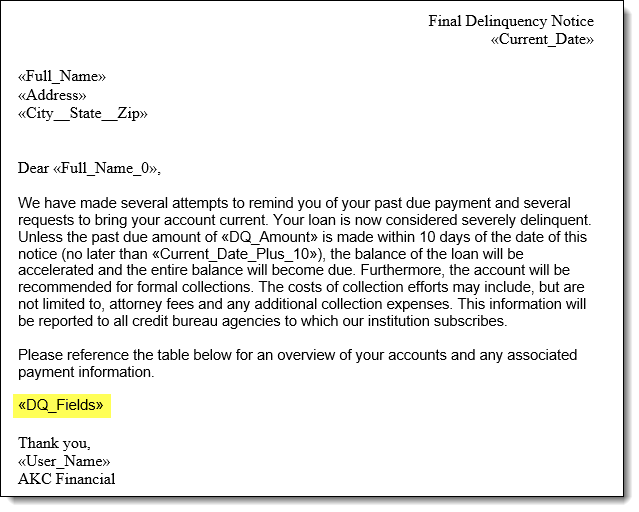
|
Once a grid has been added, the field and grid properties can be modified by selecting the grid name within the Grids tab and clicking Edit. |
To add a barcode to a letter template:
|
Only one barcode can be added to a letter template; therefore, only one address type can be selected for the Undeliverable Mail process. |
|
By default, the barcode placement is left justified within the footer of a letter template. When added to a template, the barcode is not visible within the Word document; therefore, while not required, it is highly recommended that the letter template is previewed after adding a barcode to ensure that the placement of the barcode does not interfere with the footer configured for the template. Please see the Preview Template section in this topic for more information. |
After the letter text has been defined and all desired fields/grids have been added, navigate to the Preview section to view how the letter appears when generated.
Within this section, enter the following information to preview a letter template including account, case, and/or person information:
| Field | Description |
| Account # | Enter an account number to generate the letter and populate information for the account and any related account holder(s) into the applicable fields. |
| Case # | Enter a case number to generate the letter and populate information for the case and any related person(s) into the applicable fields. |
| SSN/TIN | Enter a SSN/TIN to generate the letter and populate information for the person and any related accounts or cases into the applicable fields. |
Once all Preview parameters have been defined, click  to generate the letter.
|
The placement of a letter barcode cannot be modified in the Preview; however, the barcode can be moved manually during on-demand letter generation from the Send Letter workflow step. |
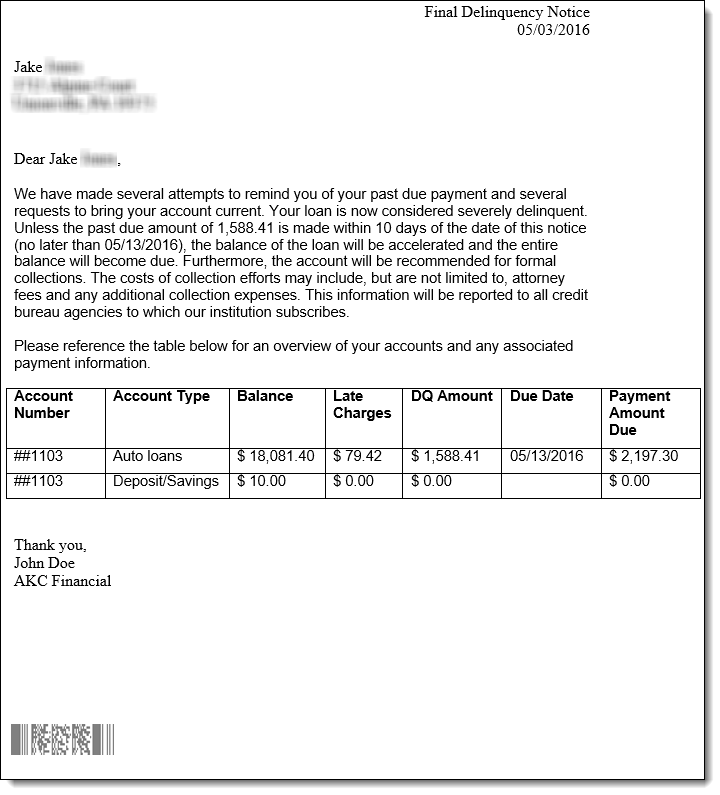
Information populates within each field configured to appear in the letter template as shown below:
After the letter content has been previewed and all desired information has been added to the template, click within the top of the Template Editor to retain the template configurations. Once is clicked, the Template Editor closes and returns to the Letter Template window to finalize the letter.
|
Creation or modification of a letter template is not complete until a final save is performed within the Letter Template window. If a final save is not performed within the Letter Template window, any configurations made within the Template Editor are not retained. |
 Fields